How to create HTML responsive signatures on a MAC (with pictures)

Why HTML responsive signatures?

The simple answer is that more and more people are using mobile phones and your business will need to adapt. A HTML responsive email signature will automatically move it’s elements depending on the size of the screen. Using HTML will also make sure that none of your images will be missing. For this article, we will be working out how to do this on a Mac.

You will need:

  • Knowledge of inline CSS and HTML or a web developer who has these skills.
  • Your own website to upload your signature image.
  • Simple navigation skills on your Mac.

Step 1: Create it.

Create your desired email signature either with your developer or by yourself. If you wish to add your logo into the signature, make sure you upload it to your website and copy the direct link to it. If you’re using WordPress then you can access any image you upload in Dashboard > Media > Select the image you want > Look for File URL

This link can be placed in your signature and will show up as your logo in between this snippet:

<img src=”INSERT-LINK-HERE” />

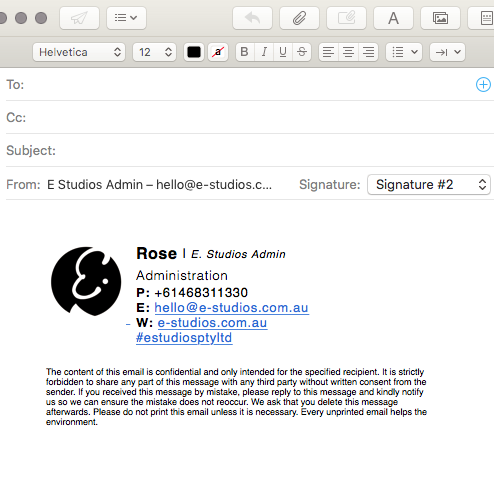
Here’s a little template of our one if it helps. Just remember to change the text as well as the links that are involved, otherwise your signature will be linking back to us. This signature will give you a format like this:

HTML Email Responsive Signature

Step 2: Use a Placeholder.

Once you’ve created your desired signature, keep it at hand. 

First, we’ll need to navigate to your mail signature preferences. Open up the mail provider and click on Mail > Preferences > Signature. You should see a window like this:

html responsive brisbane

Step 3: Find it!

Save the signature and close the mail. Completely close it. If there is a dot next to it on the dock, then it is still running. You’ll need to right click on the icon and Quit. or at the top bar, Mail > Quit Mail.

To find it in the finder, you’ll need to go to Finder > Go > Go to Folder… 

A pop up should appear and it is important that you write this exactly as it appears:

~/Library/Mail/

mail responsive design loganholme

This will take you to where your mail files are. You’ll need to find a folder labelled “Signatures” and inside this folder will be the saved file of our placeholder text. For our Mac, it was inside a folder called “MailData”.

The file will have a long string of text & numbers and will end with “mailsignature”.

email signature HTML inline

Step 4: Paste & Save.

Remember that file we said to keep in hand? This is where we’ll need it. Right click on the file and open it with Text Editor. If you can’t see the txt editor, go to Open with > Other… > and this should open up a window where you can find it. 

mail editor

This file you’re opening might also be locked, so just click on the bar at the top next to where it says “Locked” and untick the locked option.

Look for the placeholder text that you typed and copy and paste in the new one that you made. Just make sure that you do not delete the other text that are around your placeholder or it might break your signature. You might see a large chunk of text just before the placeholder that ends with “>” then another set of text after it that starts with “<“. Make sure to place your signature in between them and not accidentally delete them!

Save your file and make sure to press the “Locked” option again to keep it locked.

That’s it!

You can now open your Mail provider and this should show up as your signature. If it isn’t, just check your preferences again to make sure you’re adding your signature to mail.

If this article helped you or you simply want an expert advice on this topic, feel free to send our team a message to hello@e-studios.com.au
motion designer

Jozzelle De Jesus
B(Int)Entertainment

8th March, 2022

Searching for a web developer in Brisbane?